- The Ethereum Beacon Chain has finally sailed after reaching the minimum required 524,288 ETH threshold.
- There are several steps investors need to follow to earn passive income by staking their ETH.
The long-awaited update of the Ethereum consensus mechanism from Proof-of-Work (PoW) to Proof-of-Stake has presented holders with enough tokens the opportunity to contribute to the network while earning rewards through staking. The complete release of ETH 2.0 has been spread out into different stages that will run concurrently, and we are currently at phase 0.
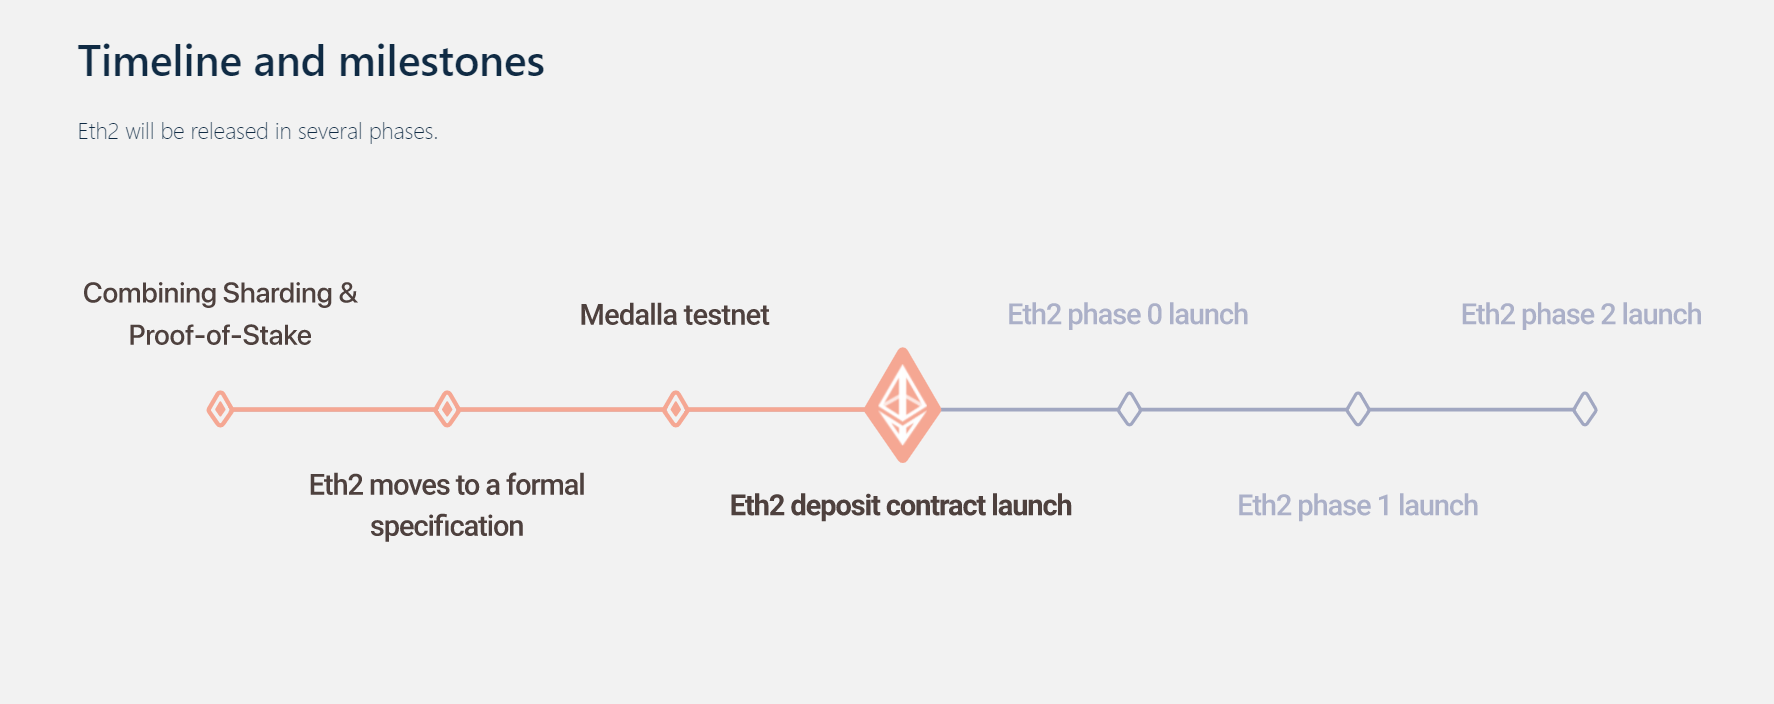
ETH 2.0 Timeline and milestone
Visit here to learn more about the Ethereum mainnet launch.
Staking is the process of participating in the blockchain activities by locking up your cryptocurrencies in exchange for incentives.
Validators on the Ethereum network will be in charge of activities such as transaction processing, data storage, and the creation of new blocks into the blockchain. Active validators currently receive about 0.4 ETH monthly, which is likely to reduce with the increase in the number of people willing to become validators.
Follow this step-by-step guide to learn how to stake your Ethereum and earn passive income.
Choose a hosting service and sign up
Before deciding which platform to use for hosting, prospective validators need to know that opting for services that will allow you to hold your private keys is very important.
The use of hosting services takes care of all the back-end operations such as software updates, ensuring that your node is hacker-proof, and, most importantly, avoiding any downtime.
After choosing a platform, sign up, and create an account. This will prepare you for the next step.
Set up your validator (for Windows users)
Open the ETH 2 launchpad and select the number of validators you would like to set up (each validator requires 32 ETH). Now select your computer’s operating system and proceed to download the command line (CLI) app.
Note: Windows files ending with windows-amd64 are for windows users and darwin-amd64 for users with Mac OS. Now download, extract the zip file and generate deposit keys.
Run the command and create your password on the command prompt interface, which will lead you to where your backup mnemonic is. This will expose unique words that can be used to gain access to your validator if you lose your files.
A message prompt showing the successful verification of your private keys will be displayed after correctly typing them.
Also, a new folder named ‘validator keys’ containing your private keys will be created. These should be kept safely, as well.
Upload validator
The process of setting up your validator begins with using the drag and drop function to transfer your deposit file to the network. This file is contained inside the folder named ‘validator folder’ and requires connection to your metamask wallet.
It is worth noting that these words should be stored safely, preferably on a piece of paper and not on your computer. Also, there will be no transfer between validators until phase 1, and their withdrawal to a specific shard cannot be made until the completion of phase 2, which is estimated to take about two years from now.
Initiate the transaction
This phase of the process involves connecting the metamask interface with the Ethereum launchpad.
Initiating the transaction requires that you connect your wallet containing a total of 32 ETH—which is needed to become a validator—with metamask.
After reading the instructions and checking the boxes, click on ‘initiate transaction’. A confirmation on metamask will send the Ethereum tokens to the ETH 2.0 deposit contract.
Complete setup
Now return to the hosting platform to finish setting up. The deposit and the validators files will be required once more to start running the server for your nodes.
After successfully creating your node, there is an expected waiting period for the nodes to collect data and synchronize with the network. It would take at least 12 hours for the transaction to be processed by the beacon chain and a few more days for the node to become active. The entire process would require roughly ten days for the transaction to be completed from start to finish.